

Table of Contents
- What You'll Need Before You Shape Foam
- Best Tools for Shaping Cosplay Foam
- How to Heat Form Foam Armor
- Pattern Making and Cutting for Cosplay Armor
- Curving, Bending, and Advanced Mold-Making Techniques
- Common Mistakes When Shaping Cosplay Foam
- Finishing, Sealing, and Repairing Heat-Damaged Foam
- Frequently Asked Questions
Last Updated: September 23, 2026
What You'll Need Before You Shape Foam
Learning how to shape foam for cosplay armor starts with the right setup, not the right technique. Most beginners jump straight to the heat gun and wonder why their edges warp.
Here's what to gather first:
- EVA foam sheets in 5-10mm thickness for most armor pieces
- A heat gun rated 300-700°F with adjustable settings
- A respirator and safety glasses
- A well-ventilated workspace, ideally a garage or covered patio
- Sharp craft knives and replacement blades
- A cutting mat and metal ruler
- Contact cement for assembly
- Duct tape for building patterns
- Sandpaper in 120, 220, and 400 grits
FoamNoodles offers craft foam rolls and spiral foam that work well for smaller armor details and curved pieces.
Best Tools for Shaping Cosplay Foam
The best tools for shaping cosplay foam fall into two groups: cutting tools and heat sources. You need both, and skimping on either shows in the final piece.
Cutting and Beveling Tools
A sharp knife matters more than an expensive one. Dull blades drag through foam and create ragged edges that no amount of sanding fixes.
- Utility knife: For straight cuts and trimming
- Scalpel or X-Acto: For detail work and tight curves
- Rotary tool with cutting wheel: For rough shaping
- Dremel with sanding drum: For beveling edges and smoothing seams
- Heat knife: For sealing edges as you cut
Heat Sources and Safety Gear
A heat gun is the standard tool for thermal forming. Craft stores sell small ones, but a full-size gun with temperature control gives you far more range.
- Heat gun with adjustable temperature
- Respirator rated for organic vapors
- Safety glasses to block flying debris
- Heat-resistant gloves for handling warm foam
- Fire extinguisher nearby, just in case
How to Heat Form Foam Armor
Heat forming turns flat foam into curved, fitted pieces. The process is simple: warm the foam until it softens, shape it, then hold it until it cools.
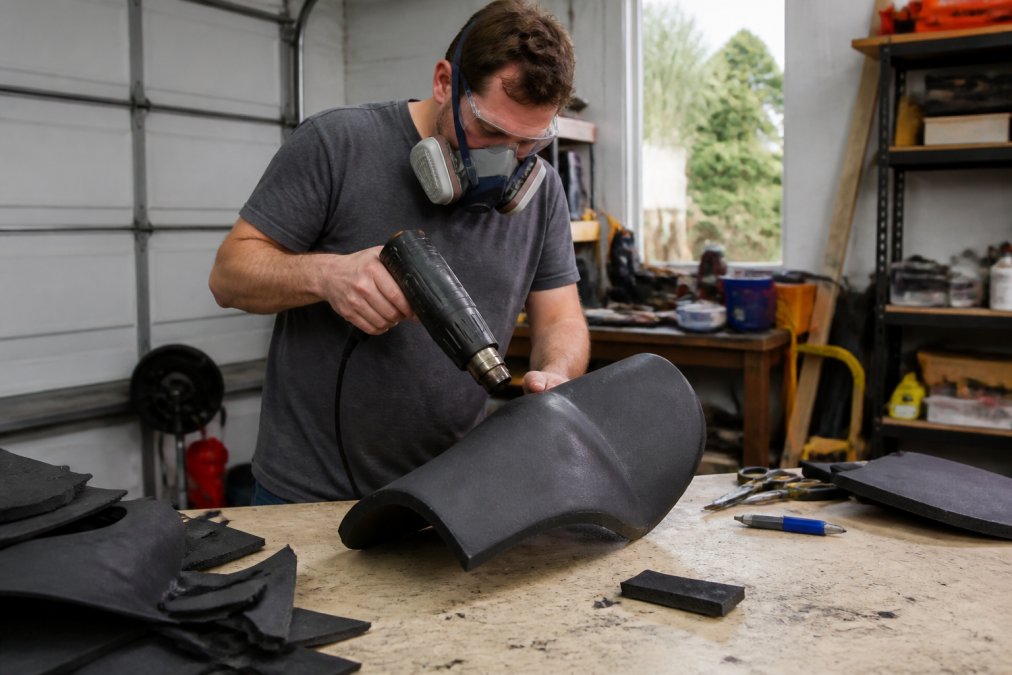
Step-by-Step Heat Forming Process
- Set your heat gun to medium (around 400°F) and let it warm up.
- Hold the gun 4-6 inches from the foam and move it in circles.
- Watch for the surface to turn glossy, which signals the foam is ready.
- Press the foam over a curved form, mannequin, or your own body (with a barrier layer).
- Hold for 30-60 seconds until the foam cools and holds its shape.
- Check the fit and reheat if needed.
Foam has memory. If you overheat it, it shrinks and loses thickness. Work in short passes rather than blasting one spot.
Pattern Making and Cutting for Cosplay Armor
Pattern making is where most cosplay projects succeed or fail. A good pattern means pieces fit together with clean seam lines.
The duct tape method works well for fitted armor:
- Wrap the body part in plastic wrap.
- Cover it with overlapping strips of duct tape.
- Draw your pattern lines directly on the tape.
- Cut along the lines and peel the tape off.
- Flatten the pieces and trace them onto foam.
Curving, Bending, and Advanced Mold-Making Techniques
Curving and bending rely on heat retention. The longer foam holds heat, the more time you have to shape it. Most crafters miss this: foam cools fast on a cold surface. Place your work surface near the heat source, or warm the form itself before pressing foam against it.
Simple Curves vs. Compound Curves
A simple curve bends along one axis, a bracer, a greave, a belt plate. You can form these by hand over a rolling pin, a PVC pipe, or your own forearm with a barrier layer between skin and hot foam.
Building a Positive Mold
A positive mold is a solid form shaped like the outside of the finished piece. You press heated foam over it, and the foam takes the mold's shape as it cools.
Three mold materials work well for cosplay-scale armor:
- Stacked foam scraps: Cheap and fast. Glue offcuts into a block, carve the curve with a rotary tool, and sand smooth. Good for one-off pieces and small runs.
Pressing Foam Over a Mold
- Preheat the mold with a light pass of the heat gun. A cold mold pulls heat out of the foam before it can take the shape.
- Heat the foam evenly on both sides until it goes glossy and floppy.
- Drape the foam over the mold and press it down with gloved hands, starting at the deepest part of the curve and working outward.
- Clamp or strap the foam to the mold. Bungee cords, spring clamps, and ratchet straps all work. The goal is even pressure, not maximum pressure.
- Let it cool completely before releasing. Rushing this step is the single most common reason a piece springs back.
Cooling Jigs for Repeatable Pieces
If you're building a matching pair of pauldrons or a set of identical plates, a cooling jig saves hours. A jig is a rigid frame, usually plywood or MDF, cut to the curve you want. You press each heated piece into the jig, clamp it, and let it cool.
Thermal Retention Tricks
- Work in a warm room. A cold garage pulls heat out of foam fast. A space heater aimed at your work area buys you extra shaping seconds.
- Heat both sides. One-sided heating leaves the core stiff, and the piece fights the curve.
- Keep a second heat gun on standby for large pieces. By the time you've shaped one end, the other has cooled.
- Use a wet rag to lock a curve. Once the foam is pressed into shape, a cool damp cloth drawn across the surface accelerates cooling and sets the shape faster than air alone.
Thermal retention is the difference between a piece that holds its shape and one that springs back. Warm your form, heat both sides, work fast, and cool under pressure, ideally in a jig you can reuse.
Common Mistakes When Shaping Cosplay Foam
Most shaping failures trace back to heat control and impatience. Here's what goes wrong, why it happens, and how to recover.
Overheating
What it looks like: The surface bubbles, darkens, or develops a shiny crust that cracks when you flex the piece. In severe cases the foam shrinks and thins.
Underheating
What it looks like: The foam bends, you clamp it, and ten minutes later it's flat again.
Skipping the Test Piece
Every new foam sheet behaves slightly differently. Before you cut a final pattern piece, run a scrap through the full heat-and-cool cycle. You'll learn the working time, the glossy signal, and the cooling rate for that specific sheet.
Cutting With Dull Blades
A dull blade drags and tears. Ragged edges survive sanding, primer, and paint, they show through all three. Swap blades often. For most craft knives, that means a fresh blade every few cuts on thick foam. Maintaining this level of precision during the initial shaping phase prevents the surface imperfections that often compromise the final finish when painting detailed models.
Poor Ventilation
Heated foam releases fumes. A small room with the door closed concentrates them fast. Work in a garage with the door up, a covered patio, or near an open window with a fan pulling air away from you. A respirator rated for organic vapors handles the rest.
Rushing the Cool
Clamping too little, or releasing too early, means warped edges. Foam needs to cool fully under pressure, usually several minutes for thick pieces. If you can still feel warmth through a glove, it isn't set.
Repairing Heat-Damaged Foam
Surface damage is recoverable. Deep damage usually isn't, but you can hide it.
Never try to reheat a burned section to smooth it. The burned cells are already compromised, and heat makes the crack worse. Sand, fill, or patch, don't re-melt.
Sanding Between Steps
A light pass with 220 grit between shaping and sealing smooths seam lines and gives primer a better grip. Don't skip it because the surface looks fine, primer reveals every scratch you left behind.
Finishing, Sealing, and Repairing Heat-Damaged Foam
Sealing protects foam from paint and wear. Most crafters use a heat-sealing pass first, then a flexible primer.
Frequently Asked Questions
What kind of foam do cosplayers use for armor?
EPE foam, which FoamNoodles carries, works well for cosplay armor because it holds shapes and resists tearing, making it suitable for lighter pieces and practice builds. It is a closed-cell foam that responds to heat forming. Thickness matters more than brand: 6mm to 10mm sheets handle most armor plates, while 2mm works for detail layers.
Can I use a hair dryer to shape EVA foam?
A hair dryer can soften thin foam, but it rarely reaches the 250-300°F needed for consistent results on thicker sheets. A heat gun gives you controlled, higher heat and lets you shape foam faster. If you only have a hair dryer, work in small sections and expect longer heating times. Always keep the nozzle moving to avoid scorching.
How do I prevent foam from wrinkling when shaping?
Wrinkles come from uneven heat and forcing the foam before it is pliable. Heat both sides of the piece, move the gun constantly, and press the foam against your form gradually. For curved pieces, a cooling jig holds the shape while the foam sets. If wrinkles appear, reheat the area and smooth it flat before it cools completely.
What is the best way to get foam to hold a curved shape?
Heat the foam until it relaxes, press it over a curved form like a PVC pipe or mannequin, then hold it in place with a cooling jig until it sets. Contact cement along seam lines adds structural support for deep curves. For sharp bends, score the back of the foam first. FoamNoodles' polyethylene flat foam roll is easy to cut and holds shape well for larger curved panels.
Shaping foam for cosplay armor takes practice, patience, and the right materials. The first piece will not be perfect. The fifth one will surprise you.
FoamNoodles stocks craft foam, polyethylene rolls, and bulk foam options for builders at every level. Our team backs every order with fast, free shipping and 1,239 verified customer reviews. Browse the full catalog and get the foam you need to start your next build.