

Best Foam for Custom Kayak Stabilizers: 2026 Guide
Editorial TeamTable of Contents
- Why Foam Kayak Stabilizers Beat Store-Bought Options
- Foam Stabilizers vs Outriggers: Which Setup Fits Your Boat
- The Best Foam for Custom Kayak Stabilizers
- Kayak Stabilizer Buoyancy: Sizing Your Floats Correctly
- How to Cut Foam for Kayak Stabilizers
- Kayak Stabilizer Attachment: Mounting Without Drilling Mistakes
- Testing Your Build and Keeping It Stable
- Frequently Asked Questions
Last Updated: October 20, 2026
Why Foam Kayak Stabilizers Beat Store-Bought Options
The best foam for custom kayak stabilizers is EPE foam, the same closed-cell material used in quality pool noodles and backer rod.
Store-bought stabilizers are engineered for a generic boat, not yours.
The trade-off is honest: foam floats degrade faster under constant UV exposure than molded plastic, so store your build out of the sun. But for kayak fishing, foam outriggers deliver stability where it counts.
Foam Stabilizers vs Outriggers: Which Setup Fits Your Boat
Foam stabilizers and outriggers solve the same problem from opposite directions. Outriggers use rigid arms and sealed pontoons on a frame; foam stabilizers use shaped closed-cell foam bolted or strapped to the hull.
| Setup | Flotation Source | Best For | Main Drawback |
|---|---|---|---|
| Foam stabilizers | Solid EPE foam floats | Sit-on-top kayaks, calm water, tight budgets | Bulkier footprint on deck |
| Outriggers | Sealed pontoon on arms | Open water, standing to cast | Higher cost, more hardware |
| Hybrid | Foam floats on PVC arms | Custom builds, adjustable width | Requires more fabrication |
For a sit-on-top fishing kayak on lakes and slow rivers, foam wins on cost and simplicity. For saltwater and swell, outriggers with sealed pontoons handle chop better.
The Best Foam for Custom Kayak Stabilizers
EPE foam, expanded polyethylene, is the best material for custom kayak stabilizers because it combines closed-cell buoyancy with enough stiffness to hold shape under load. We sell EPE exclusively, and for stabilizer floats it's the only material we'd recommend.
The key property is closed-cell structure: each bubble is sealed, so water can't wick through the foam the way it does through open-cell sponges.
EPE Foam: The Practical Choice
EPE foam cuts cleanly with a serrated knife, accepts sealant, and holds a bolt through a washer without tearing. For a 6-foot build, our Mega Jumbo Pool Noodle gives you a solid-core 5-inch diameter blank at $49.99, enough for two floats with offcuts to spare.

The honest limitation: EPE is softer than molded polyethylene, so it dents if you drop an anchor on it. Mount it where gear won't crush it.
Solid Core vs Hollow Noodles
Solid-core foam is the better choice for stabilizer floats. A hollow noodle has a center void that reduces displacement and lets water pool inside if the core breaches.
Hollow noodles still have a place as protective sleeves over a PVC arm, and they're lighter to carry. Our Oodles of Noodles Solid-Core 10 Pack at $79.99 gives you enough blanks to experiment with sizing before you commit.

Kayak Stabilizer Buoyancy: Sizing Your Floats Correctly
Kayak stabilizer buoyancy is the upward force a float provides, and it must exceed the weight you're asking it to support. Closed-cell EPE foam floats with roughly 90% of its volume submerged, so it displaces close to its own volume in water. The goal isn't to lift the kayak; it's to add enough reserve buoyancy to resist the lean when you shift weight, cast, or reach for a fish.
Step 1: Estimate the Load You Want to Offset
Start with the weight that actually causes the lean: torso weight shifted to one side, one leg, and gear in the nearest crate or hatch. A common target is 30 to 50 pounds of offset per side for a solo fishing kayak, and 50 to 70 pounds per side for a heavier paddler or a boat carrying a crate, cooler, and rod holders.
Write down three numbers before you cut foam:
- Paddler weight and the portion that shifts side to side.
- Gear weight stored off-center (crate, cooler, battery box, tackle bag).
- The lean you want to stop, in pounds, per side.
Step 2: Convert Target Offset to Foam Volume
Water weighs about 0.036 pounds per cubic inch. Divide your target offset by 0.036 to get the displaced volume you need; a 40-pound target needs about 1,110 cubic inches. Because EPE foam doesn't fully submerge, size for about 1.3 times the target so the float still has reserve when a wave or lean pushes it deeper.
| Target offset per side | Displaced volume needed | Foam volume with 1.3 margin |
|---|---|---|
| 30 lb | ~835 cu in | ~1,085 cu in |
| 40 lb | ~1,110 cu in | ~1,445 cu in |
| 50 lb | ~1,390 cu in | ~1,805 cu in |
| 60 lb | ~1,665 cu in | ~2,165 cu in |
Step 3: Match Volume to Your Foam Blank
A solid 5-inch diameter noodle has a cross-section of about 19.6 square inches; multiply by length in inches for volume. A 6-foot blank is 72 inches long, so it displaces roughly 1,410 cubic inches, or about 51 pounds of water.
A 2.5-inch hollow-core noodle displaces far less per foot than a 5-inch solid blank because the hollow center removes volume. Use hollow noodles as sleeves or trim pieces, not as the primary float, unless you bundle several together.
Step 4: Check Total Buoyancy Against the Kayak
Add the displacement of both floats and compare it to the weight the kayak carries. You don't need the floats to float the kayak on their own; you need enough reserve that a hard lean doesn't put the rail under. Aim for total float displacement of roughly one and a half times the per-side offset target, split across both floats.
Step 5: Adjust for Conditions
Calm lakes and slow rivers need less reserve than open water with boat wake or wind chop. In exposed water, add 20 to 30 percent more foam volume than your calm-water calculation. In protected water, size to the lower end of the table and test before you commit.
Keep a simple record of your numbers: target offset, foam volume, float length, and resting depth. That lets you tune the next build without starting from scratch.
Mega Jumbo Pool Noodle 6 Foot by 5 Inch Diameter - 6 Pack →
How to Cut Foam for Kayak Stabilizers
Learning how to cut foam for kayak stabilizers comes down to one rule: use a long, sharp, serrated blade and let the teeth do the work. A bread knife or drywall saw cuts EPE cleanly.
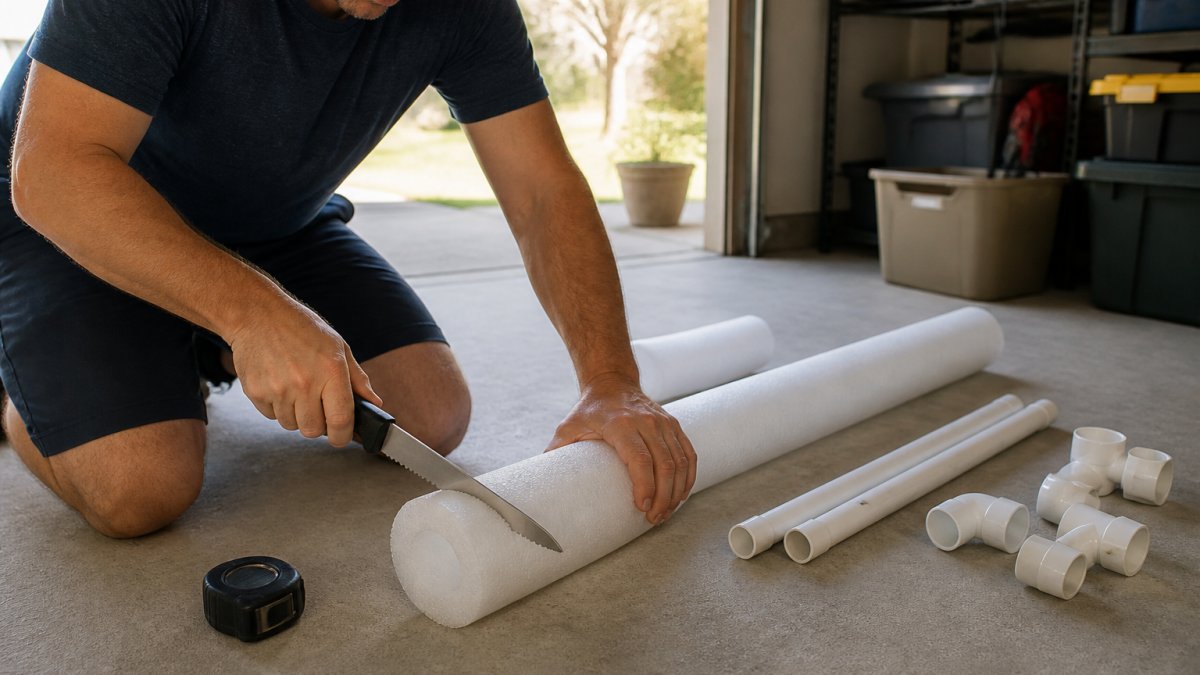
Work through it in this order:
- Mark your length with a marker and wrap tape around the cut line as a guide.
- Saw with long, light strokes, letting the blade clear the kerf.
- Sand the cut face with 80-grit paper to square it up.
- Test-fit against your PVC arm before sealing.
For a tapered float, cut a wedge from the outboard end so the float sheds water and reduces drag when paddling.
Kayak Stabilizer Attachment: Mounting Without Drilling Mistakes
Kayak stabilizer attachment fails most often at the hull, not the float.
The safest approach for a sit-on-top kayak is a crossbar frame that clamps to existing accessory tracks or straps over the hull, so you drill nothing.
- Use stainless steel bolts, washers, and nylock nuts; plain steel rusts fast in saltwater.
- Put a wide fender washer on both sides of the foam to spread load.
- Keep mounting points above the waterline where possible.
Our OodleMaxx Giant Pool Noodle at $29.99 has a 2.5-inch hollow core that slides neatly over a PVC arm, which makes a clean sleeve for the frame joint.

Testing Your Build and Keeping It Stable
Test your stabilizer in shallow water before you trust it with gear or in open water. A repeatable procedure catches attachment problems and buoyancy shortfalls before they become a swim.
Pre-Launch Bench Check
Do this on land, kayak on a flat surface, floats attached.
- Push down on each float by hand and watch the frame joints. Any flex means a loose fitting or undersized pipe.
- Try to rotate each float around its mounting bolt. A float that spins freely needs a wider washer or a second fastener.
- Check every stainless bolt, washer, and nylock nut for snugness; nylock nuts should show at least two threads past the nut.
- Look for sharp edges on washers or pipe ends that could abrade the foam.
- Measure from the hull centerline to each float; a mismatch over an inch will make the kayak track unevenly.
Shallow-Water Buoyancy Test
Launch in waist-deep water, floats attached, no gear aboard.
- Sit in the kayak and lean slowly to one side until the float engages. Note how far the rail drops before the float stops the lean.
- Lean to the other side and compare; a big difference points to a mounting or volume mismatch.
- Push down on one float while seated. It should resist firmly and return to its resting depth without staying submerged.
Loaded Stability Test
Add the gear you normally carry, then repeat the lean test.
- Shift your weight side to side as you would when casting or reaching for a fish.
- Watch the frame for bowing. A frame that flexes under load will fatigue; add a brace or shorten the arm span.
- Paddle a short loop and listen for rattles or creaks at the mounts. Noise usually means a loose fastener or foam rubbing on a hard edge.
Attachment Strength Check
After the first trip, inspect every mounting point.
- Look for compression marks in the foam around washers. Deep marks mean the load is concentrated; add a larger fender washer.
- Check for cracks in the PVC or frame at joints. A crack that grows between trips is a failure waiting to happen.
- Re-tighten nylock nuts after the first trip, then check them again after every few outings.
Maintenance Schedule
EPE foam is durable but not indestructible. A simple routine keeps the build stable season after season.
- Rinse the foam with fresh water after every saltwater trip and let it dry out of direct sun.
- Inspect the foam surface for gouges or cracks before each trip. Small nicks can be filled with sealant; deep cuts that reach the mounting bolt mean the float should be replaced.
- Store the build covered or indoors. UV exposure is the main long-term threat to EPE foam, and a covered storage spot extends the life of your floats considerably.
Frequently Asked Questions
What type of foam works best for custom kayak stabilizers?
EPE foam is the practical choice for kayak stabilizers because it is lightweight, resists water absorption, and holds its shape under load. Solid-core EPE noodles give you the most buoyancy per inch of length since there is no hollow center to displace water. Avoid open-cell craft foam, which soaks up water and loses flotation over time. For most builds, a 5-inch diameter solid EPE noodle cut to 24 to 36 inches per side gives enough displacement for a sit-on-top fishing kayak.
How much buoyancy do kayak stabilizers need?
Match float volume to the weight you want to counter. A rough rule: each cubic inch of EPE foam displaces about 0.036 pounds of water, so a 5-inch diameter noodle 30 inches long provides roughly 21 pounds of flotation per side. That is enough to steady a seated paddler reaching for a rod holder without adding excessive drag. Test with the kayak loaded as you normally paddle, and add length rather than diameter if you need more support.
How should kayak stabilizers attach to a kayak?
Most DIY builds use a PVC frame that clamps to the kayak's existing mounting points or slides into rod holder bases, with the foam floats fixed to the cross arms. Keep the attachment removable so you can transport the kayak on a roof rack. Use stainless hardware and nylon lock nuts to resist saltwater corrosion, and position the arms so the floats sit at or just above the waterline when you are seated. Check the connection by hand before every launch.
Are foam stabilizers different from kayak outriggers?
Yes. Outriggers are typically rigid arms with molded plastic or inflatable pontoons, sold as a complete system and priced accordingly. Foam stabilizers are a DIY build using EPE noodles or foam tubes on a PVC frame. Foam costs less, is easier to repair or replace, and lets you tune float size to your boat. Outriggers offer a cleaner finished look and faster setup, but they cost more and give you less control over buoyancy.
How do you keep custom kayak stabilizers from shifting?
Movement usually comes from loose mounting points or floats that slide on the frame. Clamp the PVC arms firmly and add a stop collar or wrap of tape where the foam meets the frame. Run the float's center hole over the pipe so the pipe passes through it, then cap the end. If the arms still flex, shorten them or add a diagonal brace. Recheck tightness after the first paddle, since PVC joints settle once they are under load.
How can you test DIY kayak stabilizers safely?
Start in shallow, calm water close to shore with the kayak fully loaded. Sit in the boat and lean gradually toward each float to confirm it catches your weight before you commit. Paddle a short loop and watch for drag, wobble, or hardware loosening. Do not test in current, surf, or deep water on the first outing. Carry a paddle leash and a backup plan to remove the stabilizers on the water if something shifts.
Building a stable kayak doesn't require an expensive marine accessory. It requires the right foam, a sensible frame, and a bit of patience at the cutting stage. FoamNoodles stocks solid-core EPE noodles and backer rod in the diameters that make clean stabilizer floats, with bulk options and free shipping on eligible orders. Browse our full foam range and start your build with material that holds its buoyancy trip after trip.