

7 Steps to Repair Cracked Caulk in Expansion Joints
Editorial TeamLast Updated: October 24, 2026
Quick Summary
To repair cracked caulk in expansion joints, cut out all the old sealant, vacuum the joint, and reseat a backer rod sized about 25% wider than the gap before applying a flexible elastomeric sealant matched to the joint's movement. If the concrete edges are crumbled or one side has settled, the slab needs evaluation instead of caulk.
- Cut along both joint edges with a utility knife, pry out the old bead, and vacuum the joint clean.
- Choose a backer rod roughly 25% wider than the joint opening and never puncture or fold it.
- Sealant should sit at a width-to-depth ratio near 2:1, with the product label overriding general rules.
- Match the sealant's joint-movement rating to the joint's measured widest and narrowest points.
- Keep traffic off the joint until the sealant is fully cured per the label.
Table of Contents
- Why Cracked Caulk in Expansion Joints Fails
- How to Remove Caulk From Concrete Joints
- Prepping the Joint Surface for a Lasting Bond
- Backer Rod for Concrete Expansion Joints: Sizing and Installation
- Choosing the Best Sealant for Exterior Concrete Joints
- Applying Sealant and Filling Deep or Wide Voids
- How Long Does Concrete Joint Sealant Take to Cure?
- Ordering Backer Rod for Your Joint Repair
- Frequently Asked Questions
Why Cracked Caulk in Expansion Joints Fails
Cracked caulk in expansion joints is the most common sign that a seal has lost its ability to stretch with the concrete around it. The joint opens and closes with temperature, the old sealant hardens, and eventually it splits.
Concrete moves. That's the whole point of an expansion joint. A sealant has to flex with that movement, and when it can't, it tears.
Here's what most guides get wrong: they treat cracked caulk as a cosmetic problem. It isn't. Once the seal fails, water finds the gap, and repeated freeze-thaw cycles widen the damage underneath.
Diagnose the Failure Before You Reach for a Tube
Most cracked joints are not one problem, they are one of four. The repair you choose depends on which one you have, and caulk alone is the wrong answer for two of them.
1. Sealant fatigue (the caulk itself failed). The bead is cracked, brittle, or pulled away from one edge, but the concrete on both sides is sound and the joint width is unchanged. This is the classic reseal job.
2. Backer rod failure (the filler under the caulk failed). You cut out the bead and find a collapsed, waterlogged, or missing rod. The sealant had nothing to set its depth against, so it sank, thinned at the center, and tore. Resealing without replacing the rod repeats the failure.
3. Joint movement beyond the sealant's rating (the joint is working too hard). The gap has widened noticeably since the last seal, or the crack runs the full length of the joint in a clean line. Measure the joint at its widest and narrowest points across a season if you can.
4. Structural or slab movement (caulk is not the repair). Warning signs: the concrete edges are crumbled or spalled, one side of the joint has settled lower than the other, the crack branches into the slab, or the joint has closed tight and is pushing up. These point to a concrete or subbase problem.
Signs the Joint Needs a Full Repair, Not a Touch-Up
A quick bead of caulk over a crack is a temporary patch at best. Look for these signals that tell you a full repair is the right call:
- The caulk has pulled away from one or both concrete edges
- You can see cracks running through the sealant itself
- The material feels hard or brittle instead of rubbery
- Weeds or dirt have collected in the gap
- Water pools in the joint after rain
- The sealant sits sunken below the surface
- The joint width has visibly changed since the last seal
If you spot two or more of these, plan a proper repair. A surface touch-up will fail again within a season.
When Caulk Is the Wrong Tool
Caulk, and backer rod under it, is the right repair when the joint is sound, the movement is within the product's rating, and the failure is confined to the sealant and filler. It is the wrong repair when the concrete is failing, when the joint has closed or opened beyond the sealant's range, or when water is already getting under the slab. Knowing which case you have is the difference between a repair that lasts a decade and one that fails by the next freeze.
How to Remove Caulk From Concrete Joints
Removing old caulk from concrete joints means cutting and prying out every bit of failed material, not just the visible top layer. Leftover sealant stops the new product from bonding, and that bond is everything. Achieving this level of cleanliness is just as critical when repairing masonry joints, where similar preparation techniques ensure the structural integrity of the surrounding brickwork.
Here's the removal process we recommend:
- Cut along both edges. Run a utility knife down each side of the joint to break the bond.
- Pry it out. Use a putty knife or a stiff scraper to lift the old bead.
- Go deeper than you think. Pull out any soft or loose material below the surface.
- Vacuum the joint. Clear dust and debris with a shop vac.
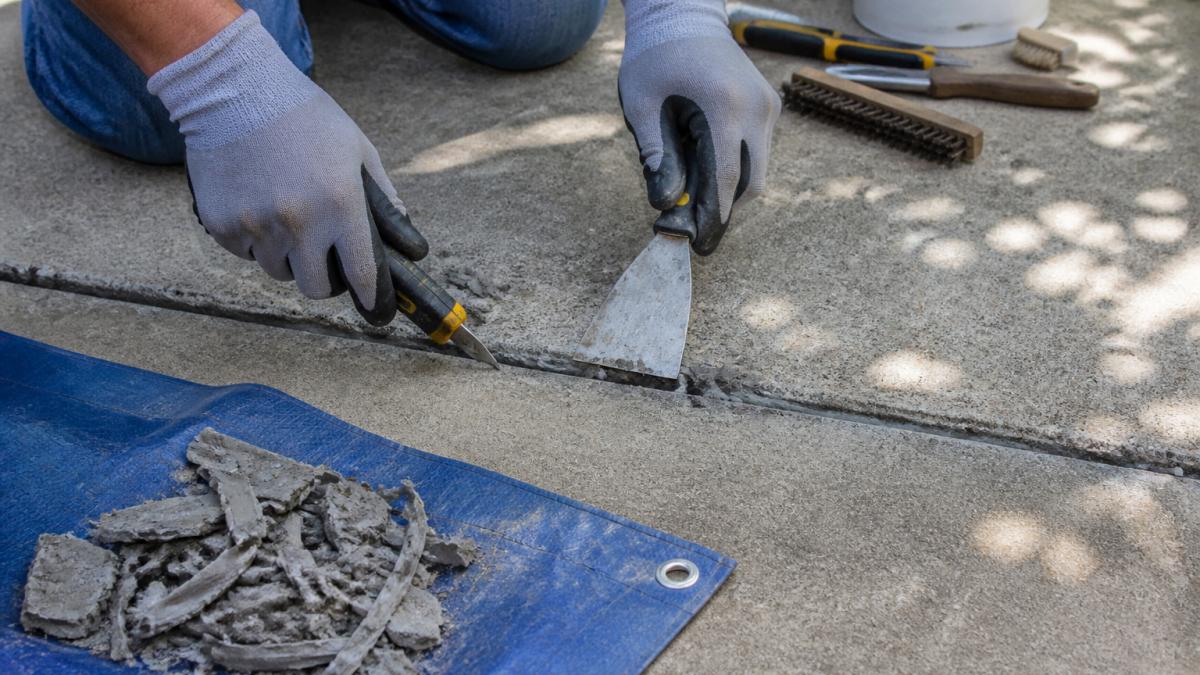
Watch out: cutting too shallow leaves a thin film of old sealant behind, and the new caulk will peel off it instead of sticking to the concrete.
Prepping the Joint Surface for a Lasting Bond
Proper surface prep is the step that decides whether your repair lasts one winter or ten. New sealant only bonds to a clean, dry, sound surface.
Work through this checklist before you open a tube:
- Joint is free of old sealant, loose concrete, and debris
- Surfaces are dry, with no frost or standing moisture
- Dust has been brushed or vacuumed out
- Crumbling concrete edges have been chipped back to solid material
- Joint sides are sound enough to hold a bond
A stiff brush gets into the corners where a vacuum can't reach. If the concrete edges crumble when you touch them, the joint needs more than a reseal. In practice, this means the repair is only as good as the surface under it.
Backer Rod for Concrete Expansion Joints: Sizing and Installation
Backer rod for concrete expansion joints is a closed-cell foam rope that sets how deep the sealant sits and stops it from bonding to the joint floor. Get the size right and the sealant forms a proper shape that flexes with movement.
The rule is simple: pick a rod slightly wider than the joint. A rod that's too small drops to the bottom and does nothing. A rod that's too big won't seat.
FILL-RITE 2" x 72" Foam Backer Rod - 4 Pack →
For narrow joints, our small-quantity backer rods come in 1/4", 3/8", 1/2", 5/8", and 3/4" sizes. For a long run, a bulk filler rope roll keeps you from running short mid-job.

Installation steps:
- Choose a rod about 25% wider than the joint opening.
- Push it in with a blunt tool or roller. Never puncture or fold it.
- Set the depth so the sealant ends up at the width-to-depth ratio the sealant maker specifies.
The outer skin on closed-cell rod resists water. Puncturing it defeats that, so keep your tools blunt.
Choosing the Best Sealant for Exterior Concrete Joints
The best sealant for exterior concrete joints is a flexible, elastomeric product rated for concrete and masonry, matched to how much the joint moves and how wide it is.
Match the product to the conditions:
| Joint Condition | Best Sealant Type | Why |
|---|---|---|
| Normal seasonal movement | Polyurethane | Strong bond, good flex, paintable in some formulations |
| High sun exposure | Silicone | UV stable, stays flexible |
| Heavy traffic, fast cure | Polyurea | Cures fast, tough, tolerates early traffic |
| Wide or deep voids | Flexible filler over backer rod | Supports the bead at the right depth |
| Joints that move a lot | High-movement elastomer | Rated for larger joint movement than standard caulk |
Match the Sealant to Joint Width and Depth
Sealant labels specify a width-to-depth ratio, commonly 2:1, meaning the bead should be about twice as wide as it is deep.
Use the joint width to set the target bead depth:
- 1/4" to 1/2" wide joint: target bead depth around 1/4" to 3/8"
- 1/2" to 1" wide joint: target bead depth around 3/8" to 1/2"
- Over 1" wide joint: target bead depth around 1/2", with backer rod sized to hold that depth
Confirm the exact ratio on the product label, manufacturers vary, and the label overrides any general rule.
Check the Movement Rating, Not Just the Chemistry
Every elastomeric sealant carries a joint-movement rating, often stated as a percentage of joint width (for example, ±25% or ±50%). Measure the joint at its widest and narrowest across a season, then choose a product whose rating covers that range.
Confirm Adhesion and Compatibility
- Check the label for concrete and masonry use, not all sealants bond well to damp or alkaline concrete.
- Confirm the product bonds to a clean, dry surface; some require a primer on porous or dusty concrete.
- Make sure the new sealant is compatible with any residual old material you could not remove. Silicone residue in particular can prevent polyurethane from bonding, so cut out silicone fully rather than sealing over it.
- Match the sealant to the backer rod: closed-cell rod is the standard pairing because it will not absorb water or outgas under the bead.
Weather and Cure Conditions
If you're still deciding, you can browse the full backer rod range to pair the right rod with your sealant.
Applying Sealant and Filling Deep or Wide Voids
For deep or wide voids, seat the backer rod first so the sealant sits at the right depth. A larger-diameter rod, like our 2.5 inch closed-cell backer rod, fills wide gaps before you caulk.

How Long Does Concrete Joint Sealant Take to Cure?
Keep traffic off the joint until the sealant is fully cured. Check the label for the exact window, and don't assume a dry surface means it's ready.
Ordering Backer Rod for Your Joint Repair
Ordering the right amount of backer rod starts with measuring. Run a tape along the joint, note the width, then pick a rod one size up.
For a typical multi-pack in a common joint size, our 2" x 72" four-pack covers 24 feet of joint. Bulk rolls suit long driveways and parking areas.

A quick sizing guide:
- Narrow joints: 1/4" to 1/2" rod
- Standard joints: 5/8" to 3/4" rod
- Wide voids: 1" and up
Measure twice, order once. Running short mid-job means a stalled repair and a second order.
Frequently Asked Questions
Do you need backer rod when caulking an expansion joint?
Yes, in most joints deeper than about 3/8 inch. Backer rod controls sealant depth so the bead stays at the width-to-depth ratio the sealant maker specifies, and it stops the sealant from bonding to the joint bottom. Closed-cell polyethylene rod, such as a 2 inch by 72 inch backer rod, also gives the sealant a bond breaker.
How do you remove cracked caulk from a concrete expansion joint?
Cut along both edges of the old bead with a utility knife, then pry it out with a putty knife or joint knife. Work in short sections and pull rather than dig. Scrape the joint walls clean, brush out loose material and sand, then vacuum the joint. The joint should be dry and free of dust before you insert backer rod.
What is the best sealant for exterior concrete joints?
A flexible, cold-applied sealant rated for exterior concrete use. Check that the sealant is compatible with closed-cell polyethylene backer rod. Match the sealant to the joint width and follow the maker's width-to-depth ratio.
How long does concrete joint sealant take to cure?
Cure time depends on the sealant type, joint depth and weather. Read the sealant label for the specific recoat and cure window.
Repairing cracked caulk in expansion joints comes down to three things: removing all the old material, prepping a clean surface, and pairing the right backer rod with a flexible sealant. FoamNoodles carries closed-cell EPE backer rod in sizes from 1/4" up to 2.5", with bulk options for long runs and fast, free shipping. Our customers have left 1,239 reviews on these products. Get started with FoamNoodles and seal your joints right the first time.
